

How To Make Fire With Chocolate And A Can

Make sure to like Living Green and Frugally on Facebook, Shop at Amazon to help support my site and explore our PINTEREST BOARDS for innovative ways you can become self-sufficient.
It sounds like one of those strange survival tricks that cannot possibly be real, but yes, you really can use chocolate to help make fire. Not by burning the chocolate itself, but by using it to polish the bottom of a drinks can until it becomes shiny enough to reflect sunlight like a tiny mirror.
This is one of those clever old survival hacks that feels almost unbelievable the first time you hear it. A chocolate bar, an empty aluminium can, a sunny day, and a little patience can give you a way to start a fire when you do not have matches or a lighter.
Before we get into it, this is important: this method should only be used safely, outdoors, and in a controlled survival or learning situation. Never try this indoors, near dry grass, near sheds, near fuel, or anywhere a fire could spread. Always have water nearby, and make sure the fire is fully out when you are finished.
How Does Chocolate Help Make Fire? 🍫🔥
Chocolate does not magically burst into flames. The clever part is what chocolate contains.
Most chocolate bars contain cocoa butter and fine particles that can act like a mild polishing compound. When rubbed onto the bottom of an aluminium drinks can, it helps smooth and shine the metal surface. The base of a can is slightly curved, which means once it becomes shiny enough, it can focus sunlight into a small hot point.
That hot point can then be aimed at very dry tinder, such as dry grass, char cloth, dry bark shavings, or cotton wool. With enough sunlight and patience, the focused heat can create a tiny ember. Once you have an ember, you can gently blow it into flame using more dry tinder.
It is simple in theory, but it does take patience.
What You Need
To try this survival trick safely, you will need:
- One empty aluminium drinks can
- A small piece of chocolate
- A soft cloth, paper towel, or piece of fabric
- Very dry tinder
- Bright direct sunlight
- A safe outdoor area
- Water nearby for safety
The best can to use is one with a smooth, uncrushed bottom. A clean fizzy drink can works well. The chocolate does not need to be expensive, but a softer chocolate bar tends to make polishing easier.
Step 1: Clean The Bottom Of The Can
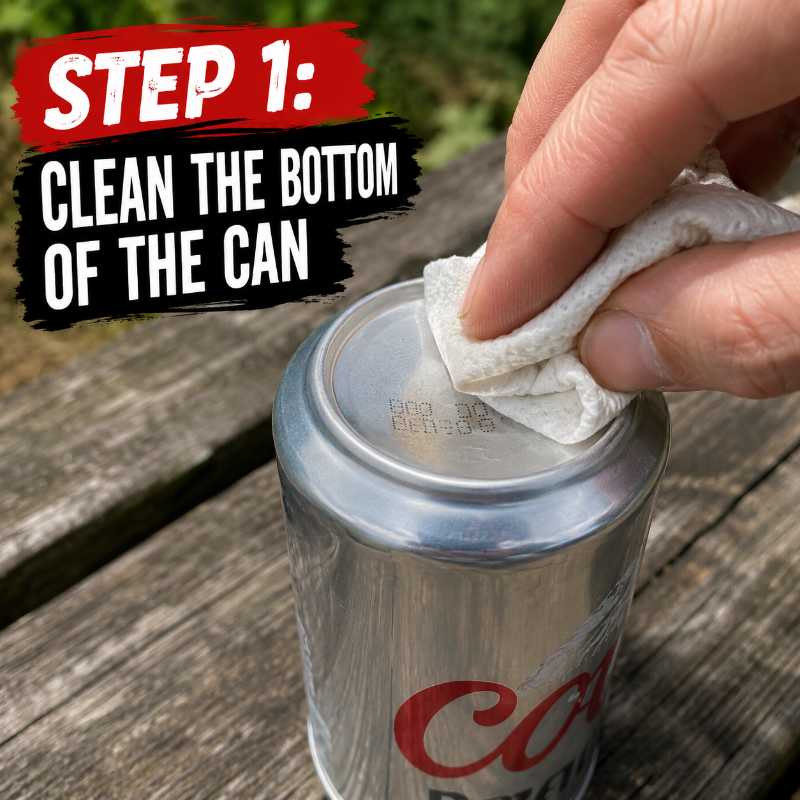
Start by making sure the bottom of the can is clean and dry. Dirt, sticky drink residue, and dust will make it harder to polish the metal.
Turn the can upside down and look at the curved base. This is the part you are going to polish. The goal is to make it as shiny as possible, almost like a small mirror.
If the can is badly scratched or dented, it may not work very well. You want the light to reflect cleanly from the curved surface.
Step 2: Rub Chocolate Onto The Can 🍫
Break off a small piece of chocolate and rub it over the bottom of the can. You only need a thin layer. Do not leave big chunks of chocolate on the metal. You are using it as a polish, not as fuel.
Once the bottom is coated, use a soft cloth, paper towel, or fabric to rub the chocolate into the aluminium. Use small circular movements and keep going.
This is the part where patience matters. It may take several minutes of rubbing before you notice the metal starting to look brighter.
Step 3: Keep Polishing Until It Shines
Wipe away the excess chocolate and check the surface. If it still looks dull, rub a little more chocolate on and polish again.
You are looking for a bright, reflective finish. It does not need to look perfect, but the shinier it is, the better your chances are.
A dull can will scatter sunlight. A shiny can will reflect and focus it.
Think of this step like polishing a mirror. The better the shine, the stronger the reflected sunlight will be.
Step 4: Prepare Your Tinder
Your tinder needs to be extremely dry. Damp grass, fresh leaves, or thick twigs will not work.
Good tinder options include:
- Dry grass
- Dry bark scrapings
- Cotton wool
- Char cloth
- Very fine dry wood shavings
- Dry seed fluff
Make a small nest with the tinder. Keep it loose enough for air to move through it, but packed enough to catch the ember.
If you are practising at home, cotton wool or char cloth is often the easiest to test with. In a real survival situation, dry natural tinder is what you would look for.
Step 5: Focus The Sunlight
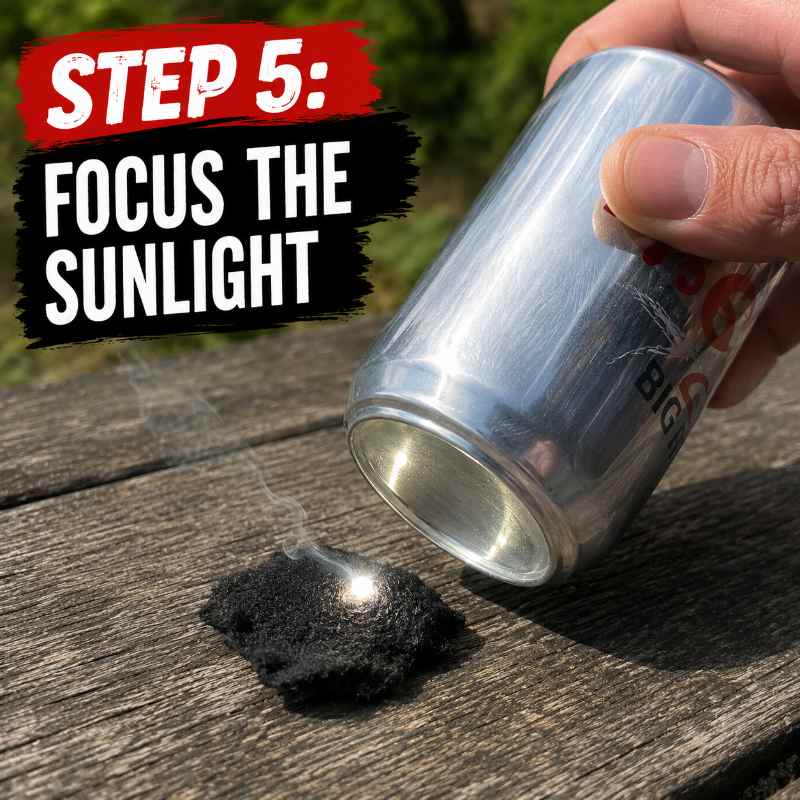
Take the polished can and face the shiny bottom toward the sun. Move your tinder around until you find the brightest, smallest point of reflected light.
This bright point is where the heat is strongest.
Hold everything steady. This part can be fiddly because even a small movement can shift the hot spot away from the tinder.
The sunlight needs to stay focused on one small area for long enough to heat the tinder. Depending on the strength of the sun and how shiny the can is, this can take time.
Step 6: Watch For Smoke
If the method is working, you may eventually see a tiny wisp of smoke. Do not rush.
Keep the light focused on the same spot until the smoke becomes stronger or you see a small ember forming.
Once you have a tiny ember, gently transfer it into the centre of your tinder nest if it is not already there. Blow slowly and carefully. Too much air can blow it out, but gentle airflow helps the ember grow.
Add more fine tinder as it catches, then slowly build up with small dry sticks.
Why This Survival Trick Works
This trick works because the polished can acts like a reflector. The curved base helps concentrate sunlight into a small point, similar to how a magnifying glass can focus the sun.
The chocolate is simply a polishing aid. It helps turn a dull aluminium surface into something shiny enough to reflect light more effectively.
It is a brilliant example of using ordinary items in an emergency. A chocolate bar and a drinks can might not seem like survival tools, but with a little knowledge, they can become useful.
Important Safety Tips ⚠️
Fire should always be treated with respect. Even a small flame can spread quickly in dry weather.
Only try this:
- Outdoors
- In a safe open area
- Away from dry leaves, fences, sheds, and buildings
- With water nearby
- With adult supervision if children are watching
- When you can fully put the fire out afterwards
Never leave embers behind. Pour water over the area, stir the ashes, and check that everything is cold before walking away.
Also remember that this method depends on strong sunlight. It will not work well on cloudy days, in shade, in rain, or late in the evening.
Common Mistakes People Make
One of the biggest mistakes is not polishing the can enough. If the base is still dull, the sunlight will not focus properly.
Another mistake is using tinder that is too damp or too thick. You need fine, dry material that can catch from a tiny ember.
People also give up too quickly. This is not as instant as striking a match. It can take time, steady hands, and the right conditions.
Finally, some people think the chocolate is what catches fire. It is not. The chocolate is only used to shine the can.
Best Chocolate To Use
A regular milk chocolate bar can work well because it is soft and easy to rub onto the can. Dark chocolate may work too, especially if it has enough cocoa butter, but it can sometimes feel drier.
Avoid chocolate with nuts, biscuit pieces, caramel, or fillings. You want smooth chocolate because it is easier to polish with.
If you do not have chocolate, some people use toothpaste as a polishing compound instead, but this article is focused on the classic chocolate method.
Is This Useful In A Real Emergency?
It can be useful, but it should not be your only fire-starting plan. This method needs sunlight, dry tinder, and time. In wet weather or at night, it will not help.
For real outdoor safety, it is always better to carry a reliable lighter, waterproof matches, or a proper fire starter. This chocolate and can trick is a clever backup skill, not a replacement for proper preparation.
Still, knowing how it works is a great survival lesson. It teaches you to think creatively and use what you already have.
FAQs About Making Fire With Chocolate

Can chocolate really start a fire?
Chocolate itself does not start the fire. It helps polish the bottom of an aluminium can so the can can reflect and focus sunlight onto dry tinder.
Does this work with any can?
It works best with an aluminium drinks can that has a smooth, curved bottom. A damaged, dirty, or very dull can may not work well.
How long does it take?
It depends on the sunlight, the shine of the can, and the tinder. It may take several minutes or longer. Patience is important.
Can I use a cloudy day?
No, this method needs strong direct sunlight. Cloudy or weak sunlight usually will not create enough heat.
Is it safe for children to try?
Children should only watch or help under close adult supervision. Fire-starting should always be treated seriously.
What tinder works best?
Very dry, fine tinder works best. Cotton wool, char cloth, dry grass, bark shavings, or dry seed fluff are good options.
Final Thoughts
Learning how to make fire with chocolate is one of those strange but brilliant survival skills that gets people talking. It is simple, clever, and uses everyday items in a way most people would never expect.
The real secret is not the chocolate catching fire. The secret is using chocolate to polish the bottom of a can until it reflects sunlight strongly enough to heat dry tinder.
It is not the fastest method, and it is not something you should rely on as your main fire starter, but it is a great skill to know. It proves that survival knowledge is often about creativity, patience, and understanding how ordinary things can be used in extraordinary ways.
Just remember to practise responsibly, keep safety first, and never start a fire unless you can control it completely.