

How To Make Survival Cement

Make sure to like Living Green and Frugally on Facebook, Shop at Amazon to help support my site and explore our PINTEREST BOARDS for innovative ways you can become self-sufficient.
If you ever needed to build a basic shelter without access to bags of commercial cement, there is an old-fashioned alternative worth knowing about. Often called survival cement, it is made from clay-rich soil, water and dry plant fibres.
Survival cement is not the same as Portland cement or concrete. It is closer to the natural mixtures used to make cob, adobe and traditional mud plaster. When properly mixed and protected from constant rain, it can be used to fill gaps, cover woven walls, make small repairs and create simple non-structural features around a camp or homestead.
The materials may be basic, but getting the proportions and consistency right makes an enormous difference. Here is how to make survival cement, how to test it and where it can safely be used.
What Is Survival Cement?
Survival cement is a mixture of:
- Clay-rich soil, which acts as the binder
- Water, which makes the mixture workable
- Dry grass or straw, which adds tensile strength and reduces cracking
- Sand, when needed to control shrinkage and improve the texture
The clay holds the mixture together while the fibres help prevent it from breaking apart as it dries. Sand creates a more stable mixture and reduces the amount of shrinking caused by clay.
This material has several names depending on how it is prepared and used. A thick mixture containing soil and straw is generally similar to cob, while blocks formed in moulds and dried in the sun resemble adobe bricks.
An Important Safety Warning
Survival cement is useful, but it should never be treated as a direct replacement for modern structural concrete.
Do not use it for foundations, retaining walls, chimneys, permanent load-bearing walls or anything that could injure someone if it failed. It should not be used to hold back water, support a roof without a properly engineered frame or line a cooking surface that will come into direct contact with intense flames.
Natural buildings also need protection from groundwater and driving rain. If you are planning a permanent cabin, home, wall or outbuilding, consult an experienced natural builder and check local building regulations first.
Materials You Will Need
To make a small batch, gather:
- 1 bucket of clay-rich subsoil
- 1 to 2 buckets of coarse sand, depending on the soil
- Approximately ½ bucket of water
- 1 bucket of chopped dry grass or straw
- A mixing container, tarp or shallow pit
- A shovel, hoe or strong mixing stick
- Gloves
- A small jar for testing the soil
Avoid using dark, crumbly topsoil. It contains roots, leaves and other organic matter that will eventually decompose. The best material usually comes from the mineral-rich subsoil beneath the top layer.
Step 1: Check Your Soil for Clay
Not every type of soil will make good survival cement. Very sandy soil will fall apart, while almost pure clay may crack badly as it dries.
Start with a simple hand test. Moisten a handful of soil and knead it until it feels like modelling clay. Roll it into a long sausage or ribbon.
If it immediately crumbles, the soil probably contains too much sand. If it forms a smooth, flexible ribbon, it contains a useful amount of clay.
For a better idea of what is in your soil, perform a jar test:
- Fill a clear jar about one-third full with soil.
- Add water until the jar is nearly full.
- Close the lid and shake it vigorously.
- Leave it undisturbed for at least 24 hours.
The largest sand particles settle first, followed by silt and then the finest clay particles. Organic debris may float on top.
This test will not give laboratory-level results, but it can help you judge whether you need to add more clay or sand.
Step 2: Prepare the Plant Fibres
Gather dry grass, straw, dried reeds or another tough plant fibre. Remove seeds, thick woody pieces and anything damp or mouldy.
Chop the material into pieces approximately 2 to 6 inches long. Short fibres are easier to mix, while slightly longer fibres can help bind a thick wall mixture together.
Dry straw is usually preferable to fresh grass. Fresh material contains moisture and may shrink, rot or encourage mould inside the finished mixture.
Step 3: Make the Mud Base
Break up the clay-rich soil and remove stones, roots and sticks. Place it on a strong tarp, in a shallow pit or inside a mixing container.
Add water gradually and work it into the soil. You can mix it with a shovel, but traditionally this type of material is mixed by carefully treading it with bare or booted feet.
The finished base should feel thick, sticky and mouldable. It should not be watery or run through your fingers.
Add only a little water at a time. It is much easier to add more water than it is to rescue a soupy mixture.
Step 4: Add Sand if Needed
Pure clay can shrink and develop deep cracks as it dries. Adding coarse, clean sand creates a more stable mixture.
Begin with approximately one bucket of sand for every bucket of clay-rich soil. Fold and knead the mixture thoroughly. Depending on the natural soil composition, you may need more or less.
The correct ratio cannot be identical for every location because soil varies considerably. Testing a few small batches is the most reliable approach.
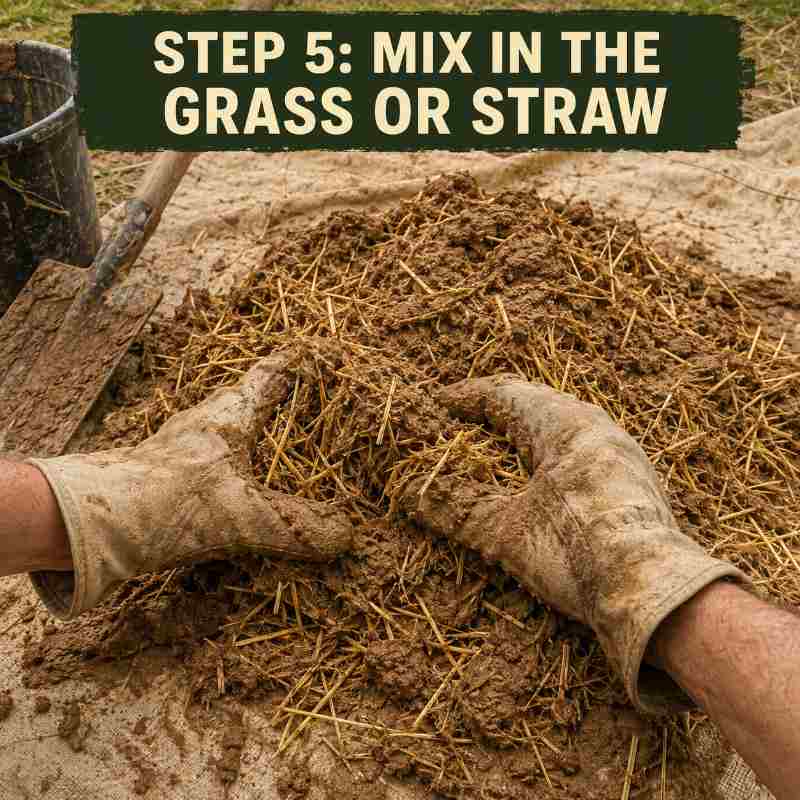
Step 5: Mix in the Grass or Straw
Spread the mud mixture out and scatter a layer of chopped fibre over it. Fold the mud over the fibre, knead it and repeat.
Continue adding plant material until the fibres are distributed throughout the mix. A good batch should hold together as one mass without leaving handfuls of loose straw.
When squeezed, it should keep its shape. If it slumps or oozes, it contains too much water. If it crumbles, it may need more clay or a small amount of water.
Step 6: Make Test Bricks
Before using a large batch, form several brick-sized samples with different amounts of sand and fibre. Label them so you remember each mixture.
Leave the samples to dry slowly in a sheltered, well-ventilated area. Do not put them in intense sunlight immediately because drying the outside too quickly can cause cracking.
After several days, examine them:
- Large cracks usually indicate too much clay or insufficient sand.
- A crumbly surface may indicate too much sand or insufficient clay.
- Weak bricks that pull apart may need more fibre or better mixing.
- Small hairline cracks are fairly normal and can often be filled later.
Choose the batch that dries hard, stays together and develops the fewest cracks.
How To Apply Survival Cement

Slightly dampen the surface before applying the mixture. A bone-dry surface can pull moisture from the cement too quickly and weaken the bond.
Press the material firmly into gaps and around the supporting framework. If building up a thick area, apply it in manageable layers rather than one enormous coat. Allow each layer to become firm before adding the next.
Smooth the surface using wet hands, a flat board or a simple wooden trowel. Keep the finished work protected from rain while it dries.
Drying can take several days or even weeks depending on thickness, temperature and humidity. Slow, even drying generally produces stronger results than rapid drying beside a large fire or in scorching sunshine.
Where Can Survival Cement Be Used?
Wattle-and-Daub Shelter Walls
A framework of flexible branches can be woven between upright posts and covered with survival cement. The wooden lattice supports the earthen mixture while it dries.
This method can be useful for a basic temporary shelter, but the roof should be supported by its own strong frame.
Filling Drafty Gaps
The mixture can fill gaps between logs, branches or rough stones in a simple shelter. It works particularly well when packed around small twigs or fibres that give it something to grip.
For a permanent log building, use a purpose-made flexible chinking material instead.
Making Adobe-Style Blocks
Survival cement can be pressed into simple wooden moulds and allowed to dry into blocks. Turn the blocks periodically so all sides dry evenly.
These blocks must remain off damp ground and be protected by a generous roof overhang. They are not fired bricks and can deteriorate after prolonged exposure to water.
Natural Wall Plaster
A finer version with shorter fibres can cover and smooth an earthen wall. Apply a coarse base layer first and a thinner finishing coat afterwards.
A suitable natural finish can offer additional weather protection, although no earthen coating should be assumed to be completely waterproof.
Small Camp and Garden Projects
The mixture may also be used for temporary garden edging, decorative features, experimental models and repairs to existing cob or adobe surfaces.
If you enjoy practical self-sufficiency projects, these 14 off-grid projects that reduce energy and water use offer several more ideas for a resourceful homestead.
Where You Should Not Use It
Do not use survival cement for:
- House foundations
- Retaining walls
- Underground rooms
- Well linings or water tanks
- Structural beams or columns
- Chimneys or flues
- Permanent fireplaces
- High-temperature fire pits
- Walls that must support a heavy roof
- Projects exposed to flooding or constant moisture
A low-cost earthbag root cellar may look like a similar natural-building project, but underground structures require careful engineering, drainage, ventilation and protection against collapse.
How To Protect It From Rain
Water is the greatest weakness of unfired earth construction. A good natural structure needs what builders sometimes describe as good boots and a good hat.
That means raising the earthen wall above wet soil and covering it with a wide, dependable roof. Direct water away from the base, repair cracks promptly and prevent roof runoff from splashing against the walls.
Survival cement may soften or wash away if it remains wet. It is best suited to dry climates, sheltered surfaces and temporary applications unless proper natural-building techniques are used.
For emergency shelter repairs, keeping a versatile material such as duct tape nearby can also be useful. Here are 25 practical survival uses for duct tape.
Common Survival Cement Mistakes
Using Topsoil
Topsoil contains organic matter that can decay. Dig beneath it and use clean mineral subsoil instead.
Adding Too Much Water
A wet mix is easy to spread, but it shrinks more and takes longer to dry. Aim for a stiff, mouldable consistency.
Skipping the Test Batch
Soil composition changes from one garden, field or riverbank to another. Small test bricks can prevent an entire wall from failing.
Using Fresh Grass
Fresh grass may rot and shrink. Use clean, dry, fibrous material whenever possible.
Building Directly on Wet Ground
Moisture can rise from the ground and weaken the material. Even a basic temporary project benefits from a dry, raised base.
Drying It Too Quickly
Strong heat can dry the surface before the interior, causing deep cracks. Let the material dry gradually with airflow and protection from rain.
Frequently Asked Questions
Is survival cement waterproof?
No. It is water-resistant only to a limited degree and can erode during prolonged rain. It needs a raised base, roof protection and ongoing maintenance.
How strong is survival cement?
A well-made batch can become surprisingly hard, but its strength varies with the soil, fibre, mixing and drying conditions. It should not be relied upon like structural concrete.
Can I make it without straw?
Yes, dry grass, reeds and other fibrous plant materials may work. However, the fibres must be dry, reasonably strong and mixed evenly through the mud.
Can I use beach sand?
It is better to use clean, coarse sand. Beach sand may contain salt, shells and excessive fine particles. If it is the only available material in a genuine emergency, wash it thoroughly with fresh water when possible.
How long does it take to dry?
A thin coating may firm up within a few days, while thick walls or blocks can require several weeks. Cool temperatures, high humidity and poor airflow increase drying time.
Can survival cement be used for an emergency shelter?
It can fill gaps or cover a woven branch framework, but it should not be the shelter’s only structural support. Build a stable wooden frame first and keep the earthen material protected from rain.
Can it be stored for later?
The dry soil, sand and straw can be stored separately. Once water is added, it is best to use the mixture promptly. Keep it covered while you work so it does not dry prematurely.
Final Thoughts
Learning how to make survival cement is a useful lesson in working with the materials around you. With clay-rich soil, sand, water and dry plant fibres, you can create a basic earthen material for temporary shelters, gap filling, natural plaster and small non-structural projects.
The key is to test the soil, keep the mixture fairly stiff, add enough fibre and protect the finished work from moisture. Most importantly, recognise its limits. Survival cement can be a clever natural building material, but it is not engineered concrete and should never be trusted with a critical structural job.
For a more rounded preparedness plan, consider putting together a 5-gallon emergency kit bucket and learning additional practical skills before an emergency happens