

Peanut Butter & Chocolate Acorns Recipe

Make sure to like Living Green and Frugally on Facebook, Shop at Amazon to help support my site and explore our PINTEREST BOARDS for innovative ways you can become self-sufficient.
There are some recipes that almost look too cute to eat, and these Peanut Butter & Chocolate Acorns definitely fall into that category.
Underneath that autumn-inspired chocolate shell is a soft, creamy peanut butter centre that tastes somewhere between peanut butter fudge and a homemade peanut butter cup. The tops are dipped in smooth melted chocolate, edged with tiny chocolate pieces, then finished with a little chocolate stem to give them their unmistakable acorn shape.
Best of all, there is no baking required.
These little acorn treats are perfect for fall parties, Halloween gatherings, Thanksgiving dessert tables, woodland-themed parties, lunchbox surprises, or simply making with the kids on a chilly afternoon.
And unlike some acorn treats made from cookies, this version uses a homemade peanut butter filling, which gives you the plump, smooth acorn shape shown in the photograph.
Why You’ll Love These Peanut Butter Acorns 🥜🍫
These are one of those treats that look impressive without requiring complicated decorating skills.
You’ll love them because:
- No oven is needed
- They use simple supermarket ingredients
- Chocolate and peanut butter are the perfect combination
- They can be prepared ahead of time
- Kids can help shape and decorate them
- They look fantastic on an autumn dessert board
- You can make a whole batch in around an hour, including chilling time
If you already enjoy easy peanut butter treats, my No-Bake Peanut Butter Bars and No-Bake Peanut Butter Dessert Recipe are worth trying too.
Ingredients
For the Peanut Butter Acorns
- 1 cup creamy peanut butter
- 4 tablespoons unsalted butter, softened
- 1 teaspoon vanilla extract
- 1 3/4 cups powdered sugar, sifted
- Small pinch of salt, optional
For the Chocolate Acorn Tops
- 1 cup semi-sweet or milk chocolate chips
- 1 teaspoon coconut oil or vegetable shortening, optional
- 1/2 cup mini chocolate chips or finely chopped chocolate
- 18 short pieces of chocolate-covered pretzel stick, about 1/2 inch long
Makes approximately 18 acorns.
Important Peanut Butter Tip
For the easiest mixture to shape, use a regular creamy peanut butter rather than a very runny natural peanut butter where the oil separates.
The finished mixture needs to be soft enough to bite into but firm enough to hold its acorn shape.
How To Make Peanut Butter & Chocolate Acorns
Step 1: Make the Peanut Butter Filling
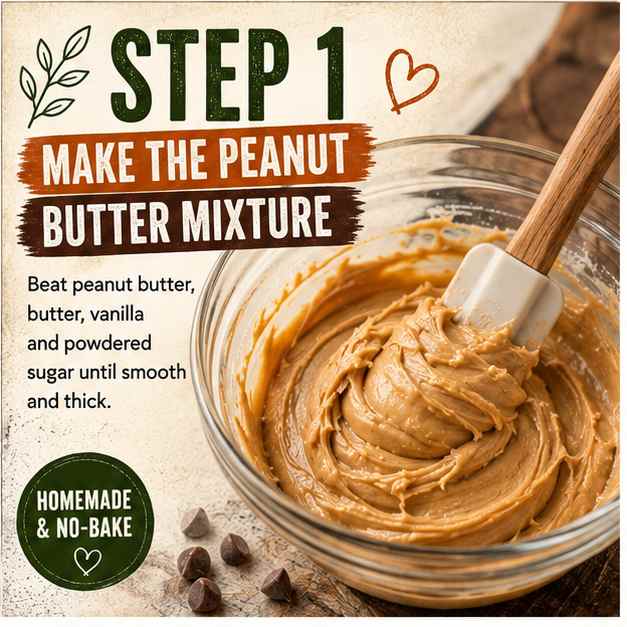
Place the softened butter and peanut butter into a medium mixing bowl.
Beat or stir them together until completely smooth.
Add the vanilla and a pinch of salt if using.
Gradually mix in the powdered sugar.
At first the mixture will look very soft, but as the powdered sugar is incorporated it should become thick enough to roll between your hands.
If it still feels very sticky, mix in another tablespoon or two of powdered sugar.
Step 2: Shape the Acorns
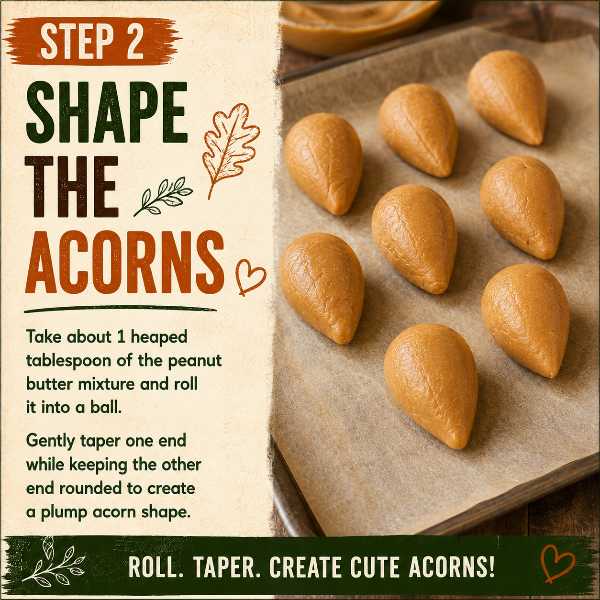
Take approximately 1 heaped tablespoon of peanut butter mixture and roll it into a ball.
Gently lengthen one end while keeping the opposite end rounded.
You are aiming for a plump teardrop or acorn shape, rather than a perfect oval.
Place each finished acorn onto a baking tray lined with parchment paper.
Repeat until all the mixture has been used.
Step 3: Chill Until Firm
Place the tray in the refrigerator for around 20 to 30 minutes, or in the freezer for about 10 to 15 minutes.
You do not want the centres frozen solid. They simply need to be firm enough to dip without losing their shape.
This little chilling step makes decorating much easier.
Step 4: Melt the Chocolate
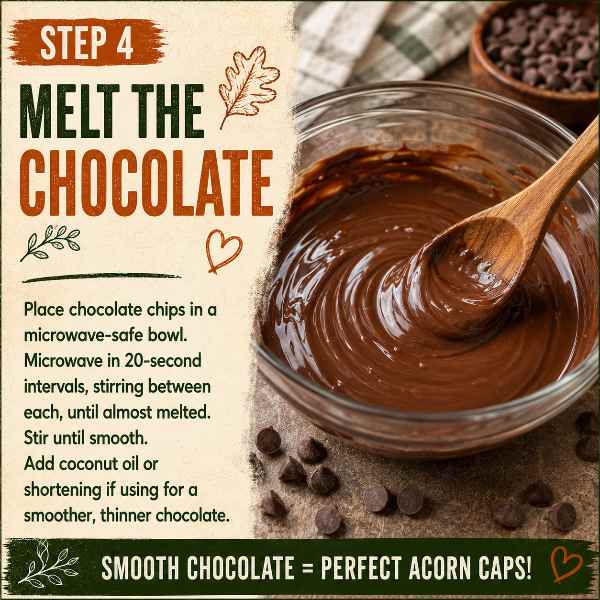
Place the chocolate chips in a microwave-safe bowl.
Microwave for approximately 20 seconds at a time, stirring thoroughly between each burst, until almost completely melted.
Continue stirring and the remaining chocolate should melt from the residual heat.
You can stir in 1 teaspoon of coconut oil or shortening if you want a slightly thinner, smoother chocolate coating.
Step 5: Make the Chocolate Acorn Cap
Hold one chilled peanut butter acorn by its pointed end.
Dip the rounded top third into the melted chocolate.
Lift it out and allow the excess chocolate to drip back into the bowl.
You want a smooth chocolate cap rather than covering the entire peanut butter centre.
Before the chocolate sets, gently press or roll only the bottom edge of the chocolate cap into the mini chocolate chips.
This creates the rough little textured band you can see around the chocolate caps in the finished acorns.
The upper part of the cap should remain smooth and glossy.
Step 6: Add the Little Stem
While the chocolate is still soft, push a small piece of chocolate-covered pretzel stick into the centre of the chocolate cap.
Only a short piece should be visible.
This instantly transforms the peanut butter treat into a little edible acorn.
Return it to the parchment-lined tray and repeat with the remaining acorns.
Step 7: Let Them Set
Place the finished chocolate acorns back into the refrigerator for approximately 15 to 20 minutes, or until the chocolate has completely hardened.
Once set, they are ready to serve.
Arrange them on a rustic wooden board with autumn leaves around the edge and they make a brilliant centrepiece for a fall dessert table.
🥜 Peanut Butter & Chocolate Acorns
Cute no-bake peanut butter treats shaped like acorns, dipped in chocolate and finished with mini chocolate pieces and a tiny chocolate stem. Perfect for fall parties, Halloween and Thanksgiving.
Ingredients
- 1 cup creamy peanut butter
- 4 tablespoons unsalted butter, softened
- 1 teaspoon vanilla extract
- 1 3/4 cups powdered sugar, sifted
- Small pinch of salt, optional
- 1 cup semi-sweet or milk chocolate chips
- 1 teaspoon coconut oil or vegetable shortening, optional
- 1/2 cup mini chocolate chips or finely chopped chocolate
- 18 short pieces of chocolate-covered pretzel stick, about 1/2 inch long
Instructions
- Make the peanut butter mixture: Beat together the peanut butter and softened butter until smooth. Mix in the vanilla and salt.
- Add the powdered sugar: Gradually mix in the powdered sugar until a soft but firm dough forms. Add another tablespoon of powdered sugar if the mixture is too sticky.
- Shape the acorns: Roll heaped tablespoons of the mixture into balls. Gently taper one end to create a plump acorn or teardrop shape.
- Chill: Place the shaped acorns onto a parchment-lined tray and refrigerate for 20 to 30 minutes.
- Melt the chocolate: Microwave the chocolate chips in 20-second intervals, stirring between each interval until smooth. Stir in the coconut oil if using.
- Make the caps: Dip the rounded top third of each peanut butter acorn into the melted chocolate. Allow excess chocolate to drip away.
- Add the texture: While the chocolate is still wet, gently press the lower edge of the chocolate cap into mini chocolate chips or finely chopped chocolate.
- Add the stem: Push a short piece of chocolate-covered pretzel into the centre of each chocolate cap.
- Set: Refrigerate the completed acorns for another 15 to 20 minutes until the chocolate is completely firm.
Storage
Store in an airtight container in the refrigerator for up to 1 week. Place parchment paper between layers. The finished acorns can also be frozen for up to 2 months.
How To Get the Same Look as the Photo
The trick is not to cover too much of the peanut butter centre with chocolate.
For the best acorn shape:
Keep the peanut butter centre plump. A slightly wider body looks more realistic than a skinny teardrop.
Dip only the top third. You want plenty of golden peanut butter filling visible underneath.
Keep most of the chocolate cap smooth. Put the mini chocolate pieces around the lower edge rather than covering the entire top.
Use a short stem. Around 1/2 inch is plenty.
Keep the acorns fairly uniform. They do not have to be identical, but similar sizes will make a tray look much more impressive.
Fun Variations
Once you have mastered the basic version, there are plenty of ways to change them.
Dark Chocolate Acorns
Use dark chocolate for the caps and finely chopped dark chocolate around the edges.
Crunchy Peanut Butter Acorns
Replace some or all of the creamy peanut butter with crunchy peanut butter for extra texture.
Salted Chocolate Acorns
Add the tiniest sprinkle of flaky sea salt to the chocolate cap before it sets.
White Chocolate Acorns
Dip the tops in white chocolate for a completely different look.
If you like experimenting with peanut butter flavours, you may also enjoy my Homemade Butterscotch White Chocolate Peanut Butter recipe.
And for another fun chocolate and peanut butter party dessert, have a look at the Peanut Butter Cup Pie Pops Recipe.
Common Mistakes To Avoid
Making the mixture too soft
If your peanut butter mixture sticks heavily to your hands and refuses to keep its shape, gradually add a little more powdered sugar.
Using warm peanut butter centres
Do not skip the chilling stage. Soft centres can slide apart when dipped into warm chocolate.
Overheating the chocolate
Chocolate can become thick or grainy if overheated. Heat it in short bursts and stir frequently.
Covering too much of the acorn
The peanut butter body is an important part of the finished appearance. Dip only the rounded top section.
Waiting too long to decorate
Add the mini chocolate pieces and stem immediately after dipping each acorn. Once the chocolate sets, they will not stick properly.
How To Store Peanut Butter Chocolate Acorns
Keep the finished acorns in an airtight container in the refrigerator for up to one week.
Separate layers with parchment paper to protect the chocolate decorations.
They can also be frozen for longer storage. Place the set acorns into a freezer-safe container with parchment between the layers and freeze for up to 2 months.
Allow frozen acorns to thaw in the refrigerator before serving.
Frequently Asked Questions

Can I make peanut butter acorns ahead of time?
Yes. They are actually a great make-ahead dessert. Prepare them a day or two before your party and keep them refrigerated in an airtight container.
Can I use milk chocolate instead of semi-sweet chocolate?
Absolutely. Milk chocolate creates a sweeter acorn, while semi-sweet or dark chocolate balances the sweet peanut butter filling.
Can I use crunchy peanut butter?
Yes, although the finished peanut butter surface will not be quite as smooth as the acorns shown in the photograph.
Why is my peanut butter mixture too sticky?
Different peanut butters have different consistencies. Add powdered sugar one tablespoon at a time until the mixture can easily be shaped.
Do these acorns need to be baked?
No. This is a completely no-bake peanut butter dessert. The only heating required is melting the chocolate.
Can children help make them?
Yes. Shaping the peanut butter mixture and decorating the chocolate caps are particularly fun jobs for children. An adult should supervise melting and handling the warm chocolate.
What can I use instead of chocolate-covered pretzels for the stems?
A large chocolate sprinkle, a small piece of chocolate candy, or even a mini chocolate chip can work. The short chocolate-covered pretzel pieces simply create a stem very similar to the ones shown in the finished photograph.
Final Thoughts
These Peanut Butter & Chocolate Acorns are proof that an impressive fall dessert does not need to be complicated.
The creamy homemade peanut butter centre, smooth chocolate cap, crunchy little chocolate pieces and tiny stem create a treat that looks almost too good to eat.
Make them for Thanksgiving, Halloween, an autumn party, a woodland-themed celebration, or just because peanut butter and chocolate together rarely disappoint.
They are cute, simple, completely no-bake, and almost guaranteed to be one of the first treats people reach for.