How To Can Green Tomato Jam: The Old-Fashioned Pantry Recipe That Saves Your Unripe Tomatoes 🍅✨
Make sure to like Living Green and Frugally on Facebook, Shop at Amazon to help support my site and explore our PINTEREST BOARDS for innovative ways you can become self-sufficient.
The Sweet Garden Trick Most People Forget About
Every gardener knows the feeling.
The season is ending, the weather is turning, and suddenly you are staring at a pile of green tomatoes that never had time to ripen. Most people either leave them to rot, toss them in the compost, or try to ripen them indoors and hope for the best.
But your grandparents probably knew better.
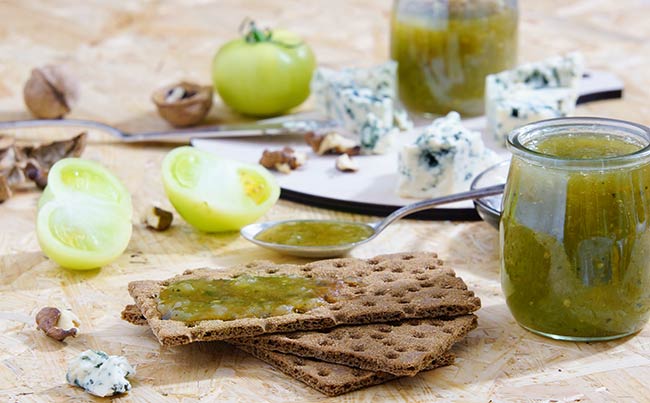
Those firm, tart green tomatoes can be turned into something absolutely delicious: homemade green tomato jam.
This old-fashioned preserve is sweet, spiced, citrusy, and surprisingly addictive. It has the bright flavour of orange and lemon, the warmth of cinnamon and cloves, and that clever frugal feeling of making something wonderful from food that might have gone to waste.
Spread it on toast, spoon it over biscuits, serve it with cheese and crackers, or use it as a sweet glaze for meats. It is one of those recipes people try once and then say, “Why have I never made this before?”
If you love canning, preserving, frugal recipes, garden harvest ideas, and old-fashioned pantry skills, this green tomato jam is a keeper. 🌿
Why Green Tomato Jam Is Worth Making
Green tomatoes are often seen as a problem, but they are actually a hidden pantry treasure.
They have a firm texture, a gentle tartness, and enough body to cook down into a beautiful jam. When combined with sugar, citrus, and warm spices, they transform into a preserve that tastes nothing like plain tomatoes.
It is more like a cross between marmalade, spiced chutney, and fruit jam.
Why You’ll Love It ❤️
✅ It uses up unripe tomatoes before frost hits
✅ It is budget-friendly and waste-free
✅ It makes a unique homemade gift
✅ It tastes amazing with sweet and savoury foods
✅ It fills your pantry with something unusual
✅ It is perfect for autumn preserving season
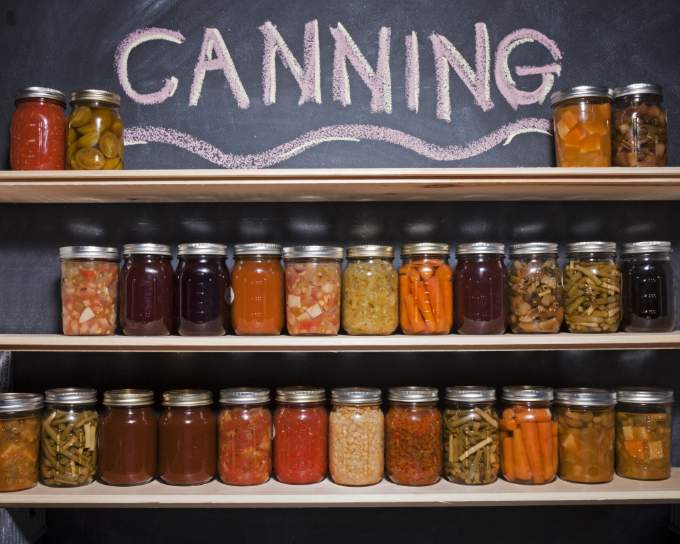
This is the kind of recipe that feels old-fashioned in the best way. Simple ingredients, practical purpose, and jars of homemade goodness lined up on the shelf.
A Quick Safety Note Before You Start
Canning is simple, but it does need to be done properly.
This recipe uses a boiling water bath method, clean jars, proper headspace, and sealed lids. Because acidity can vary in tomatoes, do not reduce the sugar, citrus, or processing time if you plan to store the jars on the pantry shelf.
If you are new to canning or unsure, you can make this as a refrigerator jam instead and store it in the fridge.
Never eat home-canned jam if the lid is bulging, leaking, mouldy, smells strange, or spurts when opened. When in doubt, throw it out.
Ingredients You Will Need 🧾
This recipe makes around 4 to 5 half-pint jars, depending on how thick you cook the jam.
Ingredients
- 2 pounds green tomatoes, finely chopped
- 1 lemon, thinly sliced and seeded
- 1 orange, thinly sliced and seeded
- 4 cups granulated sugar
- 1 teaspoon ground cinnamon
- 1/2 teaspoon ground cloves
- 1/2 teaspoon ground allspice
That is it. No fancy ingredients, no complicated extras, just simple pantry staples turned into something special.
Equipment You Will Need
- Canning jars with lids and bands
- Large water bath canning pot
- Medium or large saucepan
- Canning funnel
- Jar lifter
- Ladle
- Clean cloth or paper towel
- Canning rack or folded kitchen towel
- Small plate for testing the jam
- Towel or cooling rack
If you do not have a proper canning rack, a folded kitchen towel at the bottom of the pot can help stop the jars from rattling directly against the base.
Step 1: Prepare And Sterilise The Jars
Start by washing your jars, lids, and bands in hot, soapy water. Rinse them well.
Place the empty jars in a large pot and cover them with water. Bring the water to a boil and boil the jars for 10 minutes.
Keep the jars hot until you are ready to fill them. This helps prevent cracking when the hot jam goes in.
Place the lids in a small pan of hot, simmering water to soften the sealing compound. Do not hard boil the lids.
This step may feel boring, but it matters. Clean, hot jars are one of the most important parts of successful canning.
Step 2: Chop The Green Tomatoes
Wash the green tomatoes well and remove any stems, blemishes, or damaged spots.
Finely chop the tomatoes into small pieces. The smaller you chop them, the more evenly they cook down into the jam.
You do not need to peel the tomatoes. The skins soften as the jam cooks and help give the preserve texture.
If you prefer a smoother jam, you can chop everything extra fine or use an immersion blender carefully near the end of cooking.
Step 3: Prepare The Lemon And Orange 🍋🍊
Thinly slice the lemon and orange, then remove all the seeds.
Leave the peel on. This gives the jam a lovely marmalade-style flavour and adds a slightly old-fashioned citrus bite.
If you do not like larger pieces of citrus peel, chop the slices into smaller bits before adding them to the pan.
The citrus does three important things:
✅ Adds brightness
✅ Helps balance the sweetness
✅ Gives the jam a deeper preserve-style flavour
This is what makes the jam taste special instead of just sweet.
Step 4: Cook The Jam
In a medium or large saucepan, add:
- Chopped green tomatoes
- Lemon slices
- Orange slices
- Sugar
- Cinnamon
- Cloves
- Allspice
Stir everything together well.
Place the saucepan over medium-high heat and bring the mixture to a boil, stirring often so the sugar dissolves and nothing sticks to the bottom.
Once it reaches a boil, reduce the heat and let it simmer gently.
Cook for around 45 minutes to 1 hour, stirring regularly.
As it cooks, the mixture will become glossy, thick, and fragrant. The tomatoes will soften, the citrus will become tender, and the spices will make the kitchen smell like autumn in a jar.
Step 5: Test If The Jam Is Ready
A simple chilled plate test works really well.
Place a small plate in the freezer for a few minutes. Spoon a little hot jam onto the cold plate and let it sit for about 1 minute.
Push the jam gently with your finger.
If it wrinkles slightly and stays separated, it is ready.
If it runs back together like syrup, simmer for a few more minutes and test again.
Do not rush this part. A few extra minutes can make the difference between runny syrup and proper spoonable jam.
Step 6: Fill The Jars
Carefully remove one hot jar at a time from the canning pot.
Place the canning funnel on top and ladle the hot jam into the jar, leaving 1/4 inch of headspace at the top.
Wipe the rim of the jar with a clean damp cloth to remove any sticky residue. This helps the lid seal properly.
Place the lid on top, then screw on the band until fingertip-tight.
Do not overtighten the bands. Air needs to escape during processing so the jar can seal correctly.
Step 7: Process The Jars In A Water Bath
Place the filled jars into the boiling water bath using a jar lifter.
Make sure the jars are covered by at least 1 inch of water.
Bring the water back to a full rolling boil, then process the jars for 10 minutes.
If you live at a higher altitude, you may need to increase the processing time based on local canning guidance.
This step is what helps the jars seal and makes them suitable for pantry storage.
Step 8: Let The Jars Cool
Carefully lift the jars out of the water and place them on a towel or cooling rack.
Leave them undisturbed for 12 to 24 hours.
Do not tilt the jars, tighten the bands, press the lids, or move them around while they cool.
You may hear little popping sounds as the lids seal. That sound is one of the most satisfying parts of home canning. ✨
Step 9: Check The Seals
Once the jars are fully cool, press the centre of each lid.
If the lid is firm and does not pop up and down, the jar has sealed.
If the lid flexes or pops back, that jar did not seal properly. Store it in the refrigerator and use it within a few weeks.
For sealed jars, wipe them clean, label them with the date, and store them in a cool, dark place.
How To Store Green Tomato Jam Properly
Proper storage helps keep your jam safe and tasty for as long as possible.
Store In A Cool, Dark Place
A pantry, cupboard, or cellar is ideal. Try to keep jars away from heat, sunlight, ovens, dishwashers, radiators, and damp areas.
Keep The Jars Dry
High humidity can cause lids and bands to rust. Store jars somewhere dry and clean.
Label Everything
Write the name and date on each jar. This makes it easier to use the oldest jars first.
Check Before Opening
Before eating, check the jar carefully. Look for bulging lids, leaks, mould, strange smells, or anything unusual.
If something seems wrong, do not taste it. Throw it away.
Refrigerate After Opening
Once opened, keep the jam in the fridge and use it within a few weeks for the best flavour and quality.
Delicious Ways To Use Green Tomato Jam
This jam is much more useful than people expect.
Try it with:
🍞 Hot buttered toast
🥐 Biscuits or scones
🧀 Cream cheese and crackers
🥪 Ham or cheese sandwiches
🥩 Pork chops or roasted meats
🥣 Plain yogurt or porridge
🎁 Homemade food gift baskets
It has that sweet and spiced flavour that works with both breakfast and savoury meals.
A little spoonful on a cheese board is especially good.
Helpful Tips For The Best Green Tomato Jam
✅ Chop the tomatoes finely so the texture is even
✅ Stir often near the end so the jam does not scorch
✅ Use fresh spices for the best flavour
✅ Do not reduce the sugar if canning for pantry storage
✅ Use firm green tomatoes, not rotten or damaged ones
✅ Cook a little longer if you prefer a thicker jam
✅ Use smaller jars so the jam gets used quickly after opening
✅ Add a pinch of ginger if you want extra warmth
This is one of those recipes where simple ingredients really shine, so use the best produce you have.
Common Mistakes To Avoid
Using Damaged Tomatoes
Do not use tomatoes with mould, rot, or soft spoiled spots. Use firm, healthy green tomatoes.
Skipping The Water Bath
If you want shelf-stable jars, the water bath is important. Do not just fill jars and put them straight in the cupboard.
Overfilling The Jars
Leave 1/4 inch of headspace. Too much or too little space can affect the seal.
Forgetting To Wipe The Rims
Sticky sugar on the rim can stop the lid from sealing properly.
Moving The Jars Too Soon
Let them sit undisturbed for 12 to 24 hours. This gives the seals time to set properly.
Why This Recipe Feels So Old-Fashioned
Green tomato jam is the kind of recipe that comes from a time when people wasted very little.
If the garden gave you tomatoes that did not ripen, you found a way to use them. If you had sugar and citrus, you made preserves. If the pantry shelves were looking empty, you filled them.
That is what makes this recipe so satisfying.
It is not just jam. It is a little bit of old-fashioned kitchen wisdom in a jar.
In a world where food is expensive and waste is everywhere, recipes like this matter more than ever.
Frequently Asked Questions
Can you really make jam from green tomatoes?
Yes. Green tomatoes cook down beautifully with sugar, citrus, and spices. The finished jam tastes sweet, tangy, and warmly spiced.
Does green tomato jam taste like tomatoes?
Not really. Once cooked, it tastes more like a spiced citrus preserve or marmalade than fresh tomatoes.
Can I reduce the sugar?
If you are canning the jam for shelf storage, it is best not to reduce the sugar. Sugar helps with texture, preservation, and set. For a lower-sugar version, make it as a refrigerator or freezer jam instead.
How long does canned green tomato jam last?
Properly sealed jars stored in a cool, dark place are best used within 1 year for quality.
What if a jar does not seal?
Place it in the fridge and use it within a few weeks. Do not store unsealed jars at room temperature.
Can I freeze green tomato jam?
Yes. Let the jam cool, place it in freezer-safe containers, leave space for expansion, and freeze.
Can I make the jam smoother?
Yes. Chop everything very finely or carefully use an immersion blender before filling the jars.
What can I serve green tomato jam with?
It is lovely on toast, biscuits, crackers, cheese boards, sandwiches, roasted meats, and even stirred into yogurt.
Final Thoughts: Don’t Waste Those Green Tomatoes 🍅
Green tomato jam is one of those recipes that proves frugal living can still feel special.
Instead of tossing unripe tomatoes away at the end of the season, you can turn them into jars of sweet, spiced, citrusy jam that brighten up your pantry all year.
It is practical, old-fashioned, budget-friendly, and just unusual enough to get people talking.
So next time your tomato plants are full of green fruit and the weather is turning, do not panic. Get out the sugar, citrus, and spices, and make a batch of green tomato jam.
Your pantry will thank you later. 🌿