-0.4 C
New York
Wednesday, December 4, 2024

How To Build Large Water Storage Racks
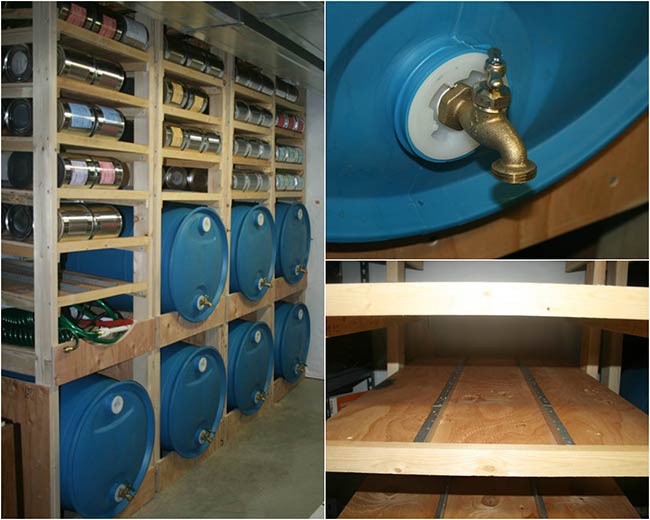
How To Build Large Water Storage Racks

Build Large Water Storage Racks
by waterstoragerack.blogspot.com

Make sure to like Living Green and Frugally on Facebook, Shop at Amazon to help support my site and explore our PINTEREST BOARDS  for innovative ways you can become self-sufficient.

Storing large amounts of water is crucial for emergency preparedness and long-term water security. Building your own large water storage racks can be a cost-effective and efficient solution. Follow this step-by-step guide to create sturdy and reliable racks for your water storage needs. For more detailed information, visit the full article here.

Materials Needed

Before you start building, gather the following materials:

  • 2×4 lumber
  • 3/4-inch plywood
  • Wood screws
  • Nails
  • Wood glue
  • Sandpaper
  • Wood finish or paint (optional)

Tools Required

Ensure you have these tools on hand:

  • Measuring tape
  • Saw (circular saw or miter saw)
  • Drill
  • Screwdriver
  • Hammer
  • Level
  • Safety gear (gloves, goggles)

Step-by-Step Instructions

Step 1: Cutting the Lumber

Begin by cutting the 2×4 lumber into the necessary lengths:

  • 8 vertical posts at 80 inches each
  • 6 horizontal supports at 57 inches each
  • 6 shorter horizontal supports at 7 inches each

Cut the plywood into three shelves measuring 57 inches by 22.5 inches. Sand the edges to ensure they are smooth.

Step 2: Assembling the Frame

Construct the frame by attaching the horizontal supports to the vertical posts. Use wood screws and wood glue for added stability. Ensure the horizontal supports are evenly spaced, with two supports at the base, two in the middle, and two near the top.

Refer to the diagram provided in the full article for precise placement of the supports. More detailed instructions can be found here.

Step 3: Installing the Shelves

Place the plywood shelves onto the horizontal supports. Secure each shelf with screws, ensuring they are level and stable.

Step 4: Reinforcing the Structure

To reinforce the structure, add additional 2×4 bracing along the sides and back of the rack. This will provide extra support for the water barrels.

Step 5: Finishing Touches

Sand all rough edges and surfaces to prevent splinters. If desired, apply a wood finish or paint to protect the wood from moisture and enhance the appearance of the rack.

Step 6: Placing the Water Barrels

Carefully place your water barrels onto the shelves. Ensure they are evenly distributed to maintain balance and stability.

For a more comprehensive guide and additional tips, visit the full article here.

Tips for Success

  • Double-check all measurements before cutting.
  • Use a level to ensure all components are straight and even.
  • Pre-drill holes for screws to prevent splitting the wood.
  • Regularly inspect the racks for any signs of wear or damage.

Building your own water storage racks is a practical project that can ensure you have a reliable water supply in times of need. For more detailed instructions and diagrams, check out the full article here.

Conclusion

With these simple steps, you can construct sturdy water storage racks that will serve you well for years to come. By following this guide and referring to the detailed article, you will have a comprehensive understanding of the process. Happy building!

For the complete guide and additional tips, visit the full article here.

Related Articles

Follow Me

- Advertisement -

Latest Articles

Must Try Recipe

Archives

- Advertisement -