How To Build A Storm Shelter/Root Cellar
Make sure to like Living Green and Frugally on Facebook, Shop at Amazon to help support my site and explore our PINTEREST BOARDS for innovative ways you can become self-sufficient.
🌪️ DIY Storm Shelter (Or Root Cellar!) – Stay Safe and Prepared! 🛡️🌱
For those of us living in areas prone to destructive storms like hurricanes and tornadoes, having a safe room or storm shelter is not just a good idea—it’s essential for peace of mind. 🌪️🌧️
The Federal Emergency Management Association (FEMA) offers construction standards for storm shelters (often called safe rooms) and may even provide grants to help states or local governments build them. Meanwhile, the National Storm Shelter Association shares valuable insight into designing and constructing storm shelters to keep your family protected.
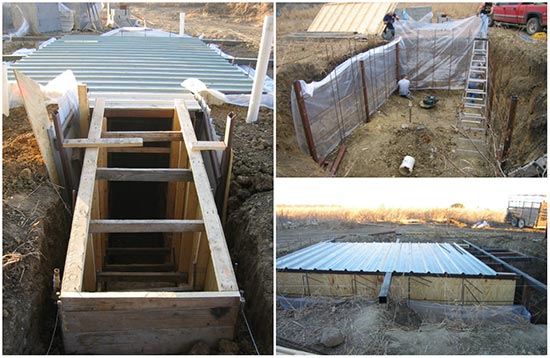
But what if you’re a homeowner and don’t have a storm shelter yet? While arranging for a professional to build a permanent shelter, you can DIY a basic berm shelter—a temporary but effective option to stay safe in case of severe weather. 🏚️🌾
🌟 Why Consider a DIY Berm Shelter?
✅ Quick & Inexpensive: You can build a basic storm shelter using locally available materials and a little elbow grease.
✅ Multi-Purpose: Besides serving as a storm shelter, it can double as a root cellar for storing veggies and canned goods. 🍠🥕
✅ Customizable: Tailor its size and structure based on your space, needs, and the number of people it needs to protect.
✅ Peace of Mind: While you plan for a more permanent structure, this gives you an immediate layer of safety. 🏃♂️🏃♀️
🏡 Pro Tips for Building a Berm Shelter:
🪵 Reinforce with Timber: Use sturdy, untreated wood to support the walls and roof.
🌱 Cover with Earth: Berming (covering with soil) adds natural insulation and camouflage.
🚪 Add a Strong Door: Ensure the entrance is secure and can withstand pressure from debris or high winds.
🌬️ Ventilation Matters: Add a small vent to prevent condensation and ensure air circulation.
👉 Stay Safe and Secure! 🛡️🌪️ For a step-by-step guide with photos and extra tips, click the link below to view the full article! 🔗 How To Build A Storm Shelter/Root Cellar