20.2 C
New York
Saturday, September 14, 2024

How to Remove Rust From Your Tools Using Electrolysis

How to Remove Rust From Your Tools Using Electrolysis

How to Remove Rust From Your Tools Using Electrolysis
How to Remove Rust From Your Tools Using Electrolysis /  Image from Pixabay

Make sure to like Living Green and Frugally on Facebook, Shop at Amazon to help support my site and explore our PINTEREST BOARDS  for innovative ways you can become self-sufficient.

Rust is the sworn enemy of tools, gradually turning your once shiny wrenches, hammers, and pliers into crusty relics. But fear not! There’s a science-backed, satisfying, and surprisingly simple method to restore your tools to their former glory: electrolysis.

This process uses a bit of electricity, a dash of chemistry, and some household items to strip away rust without damaging the underlying metal.

What You’ll Need:

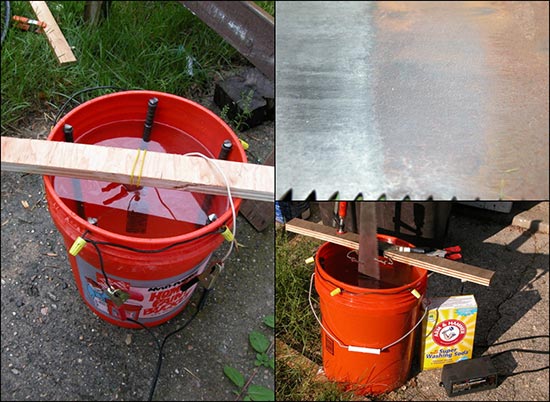
  • A Plastic Container: Large enough to fully submerge your rusty tool.
  • A Battery Charger or Power Supply: Preferably with adjustable voltage.
  • A Sacrificial Anode: Steel rebar or an old steel plate will work fine. It’s called “sacrificial” because it will corrode during the process.
  • Washing Soda (Sodium Carbonate): You can find this in the laundry aisle. It’s not the same as baking soda.
  • Water: Just good old H2O.
  • Rusty Tools: The stars of the show.
  • Protective Gear: Gloves and safety goggles are a must when working with electricity and chemicals.


View this post on Instagram


A post shared by Bob Miller (@masswoodworks)

The Step-by-Step Process

  1. Prepare the Electrolyte Solution:
    • Fill your plastic container with water, enough to submerge the rusty tool completely.
    • Add about a tablespoon of washing soda per gallon of water. Stir it until the soda is fully dissolved. This solution will help conduct electricity between the anode and your rusty tool.
  2. Set Up the Sacrificial Anode:
    • Place your sacrificial steel anode into the container. This metal will attract the rust as it’s removed from your tool. Make sure it’s completely submerged.
    • The anode and the tool should not touch each other. You can use a non-conductive material, like plastic clips, to hold them apart if needed.
  3. Connect the Power:
    • Now, carefully connect the negative (black) clamp from your battery charger to the rusty tool. This might feel counterintuitive, but trust the science!
    • Connect the positive (red) clamp to the sacrificial anode.
    • Double-check that the clamps are secure and that the tool and anode are not touching.
  4. Turn on the Charger:
    • Switch on the battery charger and set it to a low voltage, around 12 volts works well.
    • You should see bubbles rising from the tool. This is hydrogen gas being released—meaning the process is working!
    • Let the process run for a few hours, checking occasionally. The rust will start transferring to the anode, leaving your tool cleaner by the minute.
  5. Remove and Rinse:
    • Once you’re satisfied with the level of rust removal, turn off the charger and carefully disconnect the clamps.
    • Remove your tool from the solution and give it a thorough rinse with clean water to wash away any remaining electrolyte.
    • For best results, scrub the tool lightly with a brush and dry it completely.
  6. Final Touches:
    • To prevent future rusting, consider coating your newly restored tool with a light layer of oil or a rust inhibitor.

And there you have it! Your tool is now free from rust, thanks to the wonders of electrolysis. This method is particularly effective for intricate or valuable tools, as it removes rust without the harsh abrasives that can damage the metal.


View this post on Instagram


A post shared by Phil Norsworthy (@phil_norsworthy)

Alternative Ways to Remove Rust From Your Tools

If electrolysis seems a bit too science-y for you, or if you don’t have the necessary equipment, don’t worry! There are several other methods to rid your tools of rust. Here’s a rundown of some effective alternatives:

1. Vinegar Bath

  • How it Works: Submerge the rusty tool in white vinegar and let it soak for 24 hours. The acetic acid in vinegar reacts with the rust, dissolving it.
  • Process: After soaking, scrub the tool with a brush or steel wool, rinse it with water, and dry it thoroughly.
  • Pros: Simple and inexpensive.
  • Cons: Can be slow and may leave a slight patina on the tool.

2. Lemon Juice and Baking Soda

  • How it Works: The acidity of lemon juice combined with the abrasiveness of baking soda creates a powerful rust-removing paste.
  • Process: Apply the mixture to the rusty areas, let it sit for a few hours, then scrub away the rust. Rinse and dry.
  • Pros: Non-toxic and pleasantly scented.
  • Cons: Not as powerful as other methods for heavy rust.
lemon juice
lemon juice – Image by HANSUAN FABREAS from Pixabay

3. Naval Jelly

  • How it Works: This commercially available gel contains phosphoric acid, which dissolves rust on contact.
  • Process: Apply the jelly to the rusted area, let it sit according to the product instructions, then wipe or rinse it off.
  • Pros: Very effective for severe rust.
  • Cons: Contains harsh chemicals, so use gloves and work in a well-ventilated area.

4. Mechanical Abrasion

  • How it Works: Physically removing rust using tools like wire brushes, sandpaper, or a rotary tool fitted with a wire wheel.
  • Process: Scrub or sand away the rust until the bare metal is exposed.
  • Pros: Instant results.
  • Cons: Can be labor-intensive and may scratch or wear down the tool’s surface.


5. Molasses Soak

  • How it Works: Believe it or not, molasses mixed with water creates a mild acid that dissolves rust over time.
  • Process: Mix one part molasses with nine parts water, soak the tool for several days, then scrub, rinse, and dry.
  • Pros: Gentle on tools and non-toxic.
  • Cons: Very slow process—patience is required.

Final Thoughts

No one likes to see their trusted tools suffer from the ravages of rust. Whether you choose the high-tech route of electrolysis or opt for a more traditional method, the important thing is to take action before the rust spreads. With a little effort and the right approach, you can restore your tools to their former glory, ensuring they remain functional for years to come.

Happy de-rusting!

Related Articles

Follow Me

- Advertisement -

Latest Articles

Must Try Recipe

Archives

- Advertisement -