How to Build a Root Cellar / Storm Shelter
Make sure to like Living Green and Frugally on Facebook, Shop at Amazon to help support my site and explore our PINTEREST BOARDS for innovative ways you can become self-sufficient.
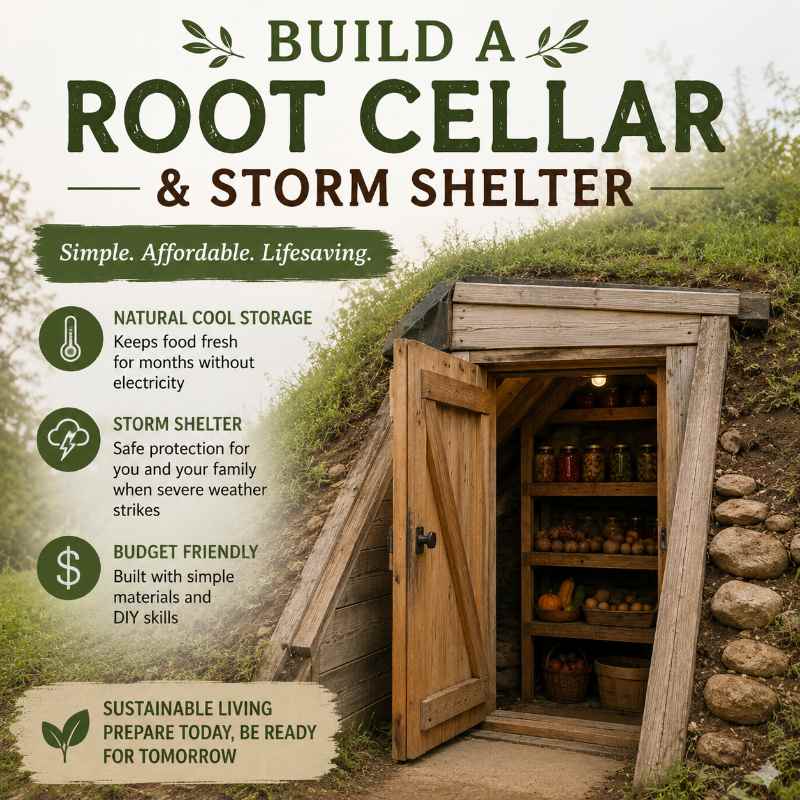
If you’re looking for a natural way to store produce or create a safe haven during a storm, building a root cellar that can double as a storm shelter is a practical and rewarding project. Root cellars have been used for centuries to keep food fresh by leveraging the earth’s consistent temperature, and with some modifications, they can also serve as a secure place to shelter during severe weather. The image provided is a perfect example of a traditional root cellar design, blending seamlessly with the landscape and offering both functionality and aesthetic appeal.
Step 1: Planning Your Root Cellar/Storm Shelter
Site Selection
- Elevation: Choose a site on slightly elevated ground to prevent water accumulation. Avoid low-lying areas prone to flooding.
- Accessibility: Ensure the location is convenient and accessible year-round.
- Soil Type: Loam or sandy soils are ideal for drainage, whereas clay-heavy soil may need additional drainage solutions.
Design Considerations
- Size: Determine the size based on your storage needs. A typical root cellar might be 8×8 feet, but if you plan to use it as a storm shelter, consider additional space for people.
- Ventilation: Proper ventilation is crucial to maintain humidity and temperature, especially for food storage. Include an air inlet at the bottom and an outlet at the top.
- Door: A solid, insulated door is essential. As shown in the image, the door should be sturdy and fitted to withstand weather elements.
Step 2: Gathering Materials and Tools
Materials Needed
- Treated lumber for framing
- Stone, bricks, or concrete blocks for walls
- Heavy-duty plastic or rubber membrane for waterproofing
- Gravel for drainage
- Soil and sod for the roof
- A sturdy door with appropriate locks
- Ventilation pipes
- Tools: Shovel, level, saw, hammer, nails, concrete mixer (if needed), and measuring tape.
Step 3: Excavation and Foundation
- Excavate the Area: Dig out the area for your root cellar. The depth should be at least 6-8 feet to maintain a cool temperature, but deeper if you plan to use it as a storm shelter.
- Create a Foundation: Lay a gravel base at the bottom of the excavation for drainage. On top of this, pour a concrete slab or place concrete blocks for the foundation walls.
- Install Drainage: Ensure that there is a drainage system in place to prevent water accumulation. Perforated pipes leading away from the cellar can help divert water.
Step 4: Building the Walls and Roof
- Wall Construction: Build the walls using stone, brick, or concrete blocks. As shown in the image, stone walls give a rustic look while providing excellent insulation and stability.
- Waterproofing: Apply a heavy-duty plastic or rubber membrane around the exterior walls to prevent moisture infiltration.
- Roofing: Construct a sturdy wooden roof frame, then cover it with waterproof material. For added insulation and to blend with the environment, cover the roof with a layer of soil and sod, as shown in the image.
Step 5: Door and Ventilation
- Install the Door: Attach a solid, insulated door. The image shows a simple but effective design with a slanted roof to shed water and prevent leaks.
- Ventilation System: Install a ventilation pipe that enters near the floor and exits near the ceiling to allow for natural airflow. This helps regulate humidity and temperature inside the cellar.
Step 6: Final Touches and Safety Features
- Interior Shelving: Add shelves for storing produce. Use wood or metal, ensuring the shelves are strong and well-ventilated.
- Lighting: Consider adding a battery-operated or solar-powered light for convenience.
- Storm Shelter Features: If using the cellar as a storm shelter, ensure the door can be securely locked from the inside, and consider adding an emergency escape hatch if possible.
- Camouflage: The design shown in the image blends seamlessly with the landscape. Cover the roof and sides with grass, plants, or moss to make the structure less conspicuous.
Conclusion
Building a root cellar that can also serve as a storm shelter is a project that combines traditional methods with modern safety considerations. The structure shown in the image is an excellent example of how you can create a functional and aesthetically pleasing addition to your property. Whether you’re storing fresh produce or seeking refuge during a storm, this dual-purpose building will serve you well.
Additional Resources
- For more detailed guides, Mother Earth News offers excellent resources on root cellar construction.
- The Prepared provides insights into building storm shelters with modern materials and techniques.