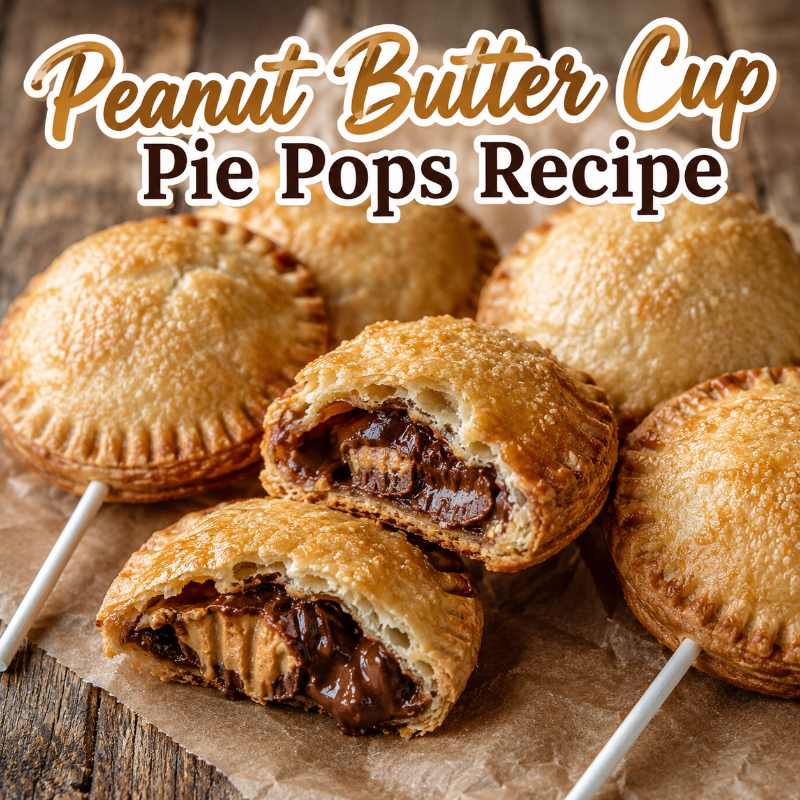
Peanut Butter Cup Pie Pops Recipe: The No-Fuss Dessert Everyone Will Grab First
Make sure to like Living Green and Frugally on Facebook, Shop at amazon to help support my site and explore our PINTEREST BOARDS for innovative ways you can become self-sufficient.
Peanut Butter Cup Pie Pops Recipe 🥜🍫
There are some desserts that look like they took hours to make, but secretly come together with simple ingredients and a little creativity. Peanut Butter Cup Pie Pops are exactly that kind of treat.
Imagine a flaky golden pastry pocket, stuffed with creamy peanut butter, melty chocolate, and chopped peanut butter cups, then baked until crisp around the edges and served on a stick like a fun little dessert lollipop. They are part pie, part cookie, part candy bar, and completely irresistible.
This is the kind of recipe people notice on a party table. They are cute, easy to hold, and just messy enough to feel homemade in the best possible way. Kids love them, adults sneak back for seconds, and they are perfect for birthdays, holidays, bake sales, movie nights, or whenever you want a dessert that feels a little bit special without being complicated.
Best of all, this Peanut Butter Cup Pie Pops Recipe is easy to customize. You can make them with ready-made pie crust to save time, dress them up with a chocolate drizzle, add sprinkles, or keep them simple and rustic.
Let’s make the sweet little dessert everyone will talk about. 😍
Why You’ll Love These Peanut Butter Cup Pie Pops
These pie pops are more than just cute. They are practical, fun, and full of that classic chocolate peanut butter flavour everyone loves.
Here’s why they work so well:
- They are handheld, so no plates or forks are needed
- They look impressive, even though they are simple to make
- They are great for parties, lunchbox treats, bake sales, and dessert trays
- They use familiar ingredients most people already love
- They are easy to decorate for different seasons and occasions
- They freeze well, so you can make them ahead
There is something about food on a stick that makes it instantly more fun. These little pie pops turn a simple dessert into something people want to pick up, photograph, share, and eat immediately.
Ingredients You Will Need 🥧
You do not need a long shopping list for this recipe. The magic is in combining simple ingredients in a fun way.
For the Pie Pops
- 2 ready-made pie crusts, chilled
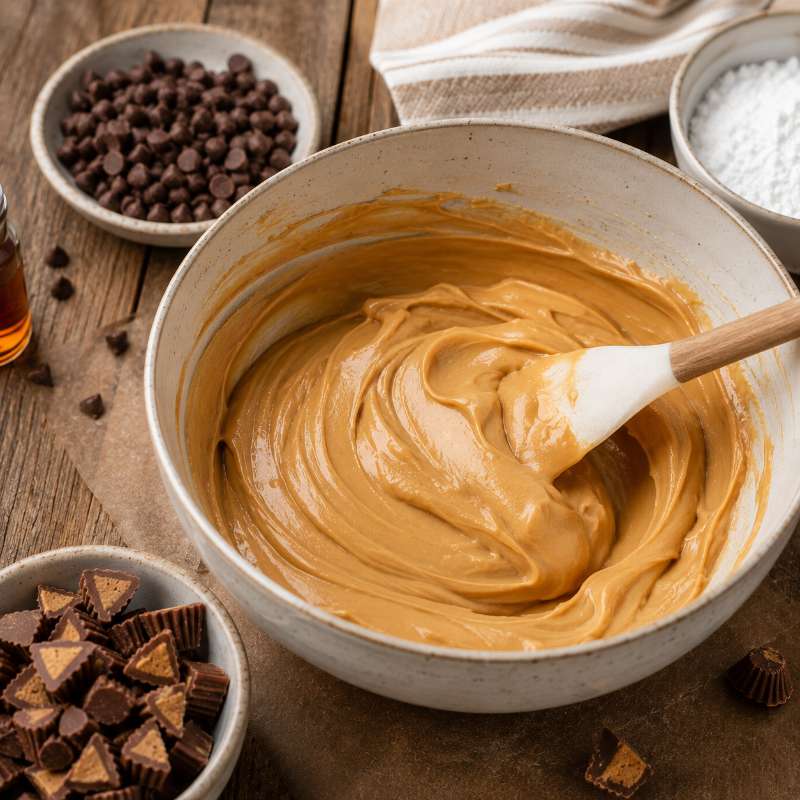
- 1/2 cup creamy peanut butter
- 1/3 cup powdered sugar
- 1/2 teaspoon vanilla extract
- 10 to 12 mini peanut butter cups, chopped
- 1/3 cup chocolate chips
- 1 egg
- 1 tablespoon milk
- Lollipop sticks or wooden popsicle sticks
Optional Toppings
- Melted chocolate for drizzling
- Crushed peanut butter cups
- Sprinkles
- Powdered sugar
- Sea salt flakes
The powdered sugar helps thicken the peanut butter filling so it does not run everywhere while baking. The chopped peanut butter cups add little pockets of chocolatey goodness inside each pop.
How To Make Peanut Butter Cup Pie Pops
Step 1: Prepare Your Baking Tray
Preheat your oven to 375°F or 190°C.
Line a baking tray with parchment paper. This helps stop the pie pops from sticking and makes cleanup much easier.
If you are using wooden sticks, make sure they are food-safe and oven-safe. Standard wooden popsicle sticks usually work well.
Step 2: Make The Peanut Butter Filling
In a small bowl, mix together the peanut butter, powdered sugar, and vanilla extract.
Stir until the mixture becomes thick and smooth. It should be spreadable but not runny.
Fold in the chopped peanut butter cups and chocolate chips. This gives every bite a mix of creamy filling, soft chocolate, and little candy pieces.
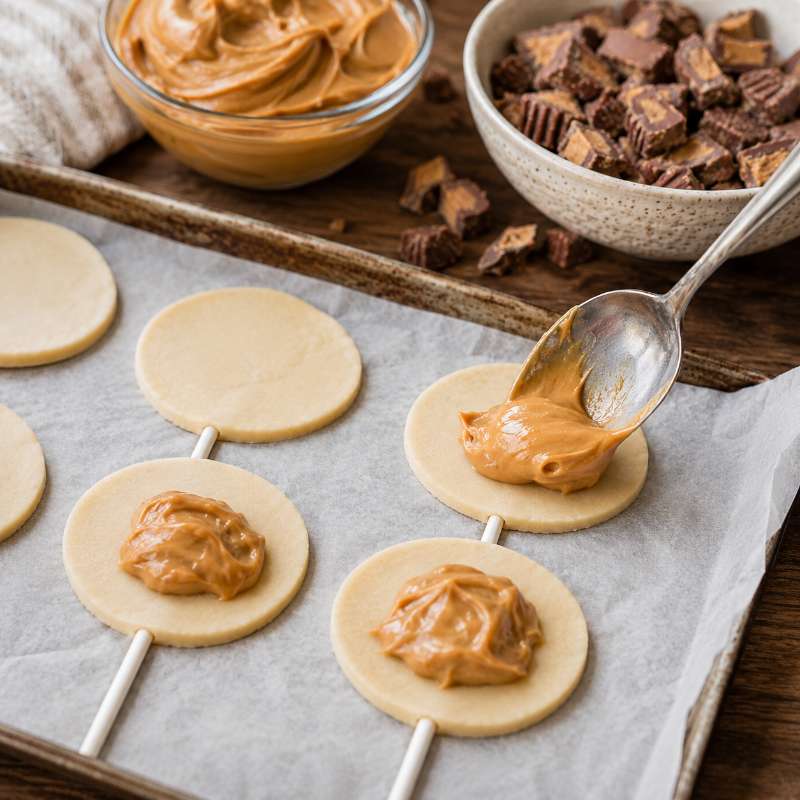
Step 3: Cut Out The Pie Shapes
Roll out the chilled pie crust on a lightly floured surface.
Use a round cookie cutter, heart cutter, rectangle cutter, or even the rim of a glass to cut out an even number of shapes.
Each pie pop needs a top and a bottom piece.
A 3-inch circle is a great size because it gives enough room for filling without making the pops too heavy.
Step 4: Add The Sticks
Place half of the pastry shapes onto your prepared baking tray.
Gently press a stick into the bottom centre of each pastry piece, making sure the stick sits about halfway into the shape. Press lightly so it grips the dough.
This helps keep the pie pop secure once baked.
Step 5: Fill The Pie Pops
Spoon a small amount of peanut butter filling into the centre of each pastry shape.
Do not overfill them. It is tempting to add a lot, but too much filling can leak out while baking.
A heaped teaspoon is usually enough for smaller pie pops.
Leave a small border around the edge so you can seal them properly.
Step 6: Seal The Edges
Place another pastry shape over the top of each filled base.
Use your fingers to gently press the edges together.
Then take a fork and crimp around the edges to seal them tightly. This gives the pie pops a pretty homemade look and helps stop the filling from escaping.
Use a toothpick or small knife to poke one or two tiny holes in the top of each pie pop. This lets steam escape while baking.
Step 7: Brush And Bake
In a small bowl, whisk together the egg and milk to make an egg wash.
Brush the tops of the pie pops lightly with the egg wash. This helps them bake up golden and shiny.
Bake for 14 to 18 minutes, or until the edges are golden brown and the pastry looks crisp.
Let them cool on the tray for a few minutes before moving them to a cooling rack. The filling will be hot, so do not bite into them straight away.
How To Decorate Them 🍫✨
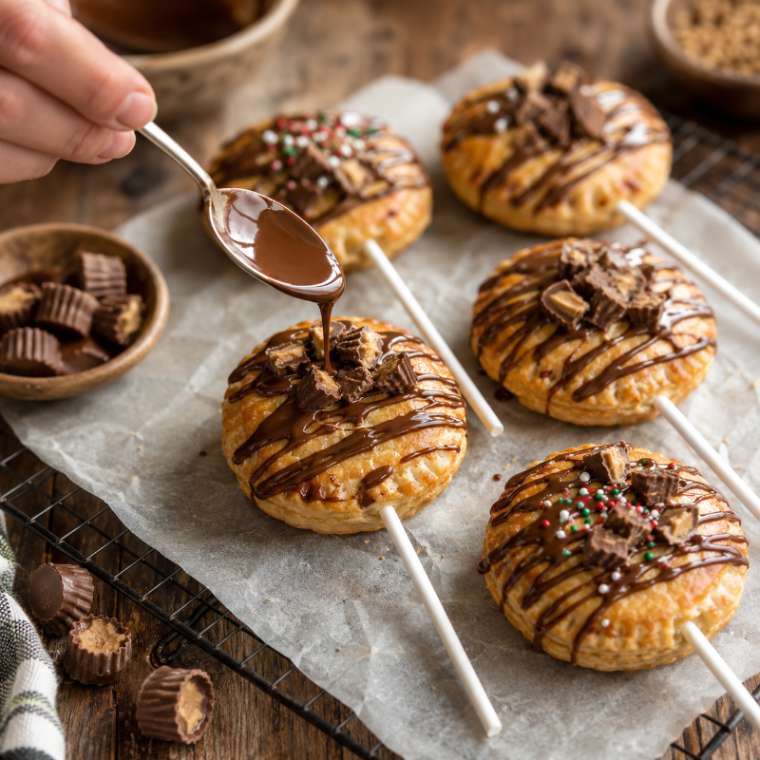
Once the pie pops have cooled, you can decorate them however you like.
For a simple finish, drizzle melted chocolate over the top and sprinkle with crushed peanut butter cups.
For parties, add colourful sprinkles before the chocolate sets.
For a more grown-up version, add a tiny pinch of flaky sea salt on top. The salt makes the chocolate and peanut butter flavour pop even more.
You can also dust them with powdered sugar if you want a simple bakery-style look.
Tips For Perfect Pie Pops
Keep the dough chilled. Warm pie crust can get sticky and hard to handle. If it becomes too soft, pop it back in the fridge for 10 minutes.
Do not overfill. Too much filling is the main reason pie pops leak.
Seal the edges well. Use both your fingers and a fork for the best seal.
Let them cool before decorating. If the pie pops are still warm, melted chocolate may slide off.
Use parchment paper. If any filling leaks, cleanup is much easier.
Make them the same size. Even shapes bake more evenly and look better on a dessert tray.
Fun Variations To Try
Once you have made the basic version, you can easily switch things up.
Try adding a spoonful of marshmallow fluff for a peanut butter s’mores version.
Use Nutella instead of some of the peanut butter for a richer chocolate filling.
Add crushed pretzels for a salty crunch.
Use heart-shaped cutters for Valentine’s Day, pumpkins for autumn, stars for birthdays, or trees for Christmas.
You can even make mini versions for dessert boards. Just remember that smaller pie pops need less filling and may bake faster.
How To Store Peanut Butter Cup Pie Pops
Store cooled pie pops in an airtight container at room temperature for up to 2 days.
For longer storage, keep them in the fridge for up to 5 days. The pastry may soften slightly, but they will still taste delicious.
To refresh them, warm them in the oven for a few minutes until the pastry crisps up again.
You can also freeze undecorated pie pops. Let them cool completely, wrap them well, and freeze for up to 2 months. Reheat in the oven from frozen until warmed through.
Common Questions About Peanut Butter Cup Pie Pops
Can I use homemade pie crust?
Yes, homemade pie crust works beautifully. Ready-made crust just makes the recipe quicker and easier.
Can I make these ahead of time?
Yes. You can assemble the pie pops and keep them in the fridge for a few hours before baking. You can also bake them ahead and decorate them later.
Can I use crunchy peanut butter?
Yes, crunchy peanut butter adds extra texture. Just make sure the filling is not too loose.
Why did my pie pops leak?
They were likely overfilled or not sealed tightly enough. Use less filling next time and press the edges firmly with a fork.
Can I make these without sticks?
Absolutely. They become mini peanut butter cup hand pies instead. They taste just as good and are even easier to pack.
Can I use different candy inside?
Yes. Chopped chocolate bars, caramel cups, mini chocolate chips, or crushed cookies can all work well.
Are these served warm or cold?
They are delicious both ways. Warm pie pops have a softer, meltier filling, while cooled pie pops hold their shape better for serving.
Final Thoughts
This Peanut Butter Cup Pie Pops Recipe is one of those desserts that feels fun, nostalgic, and a little bit over-the-top in the best way.
They are flaky, chocolatey, peanut buttery, and perfect for sharing. Whether you make them for a birthday party, family movie night, bake sale, holiday dessert table, or just because you want something sweet, these little pie pops are guaranteed to disappear fast.
The best part is how simple they are. A ready-made crust, a creamy peanut butter filling, chopped peanut butter cups, and a quick bake in the oven turn into a dessert that looks like something from a bakery.
So next time you want a treat that gets people excited before they even take a bite, make these peanut butter cup pie pops. They are cute, easy, and dangerously good. 🥜🍫